
Looking to bring your portraits to life? AniPortrait combines artistry with technology to deliver stunning results.AniPortrait is your gateway to captivating animations that sync seamlessly with audio and reference portrait images. Imagine your favorite portrait suddenly winking, nodding, or even breaking into a smile all driven by sound waves!
What is AniPortrait?
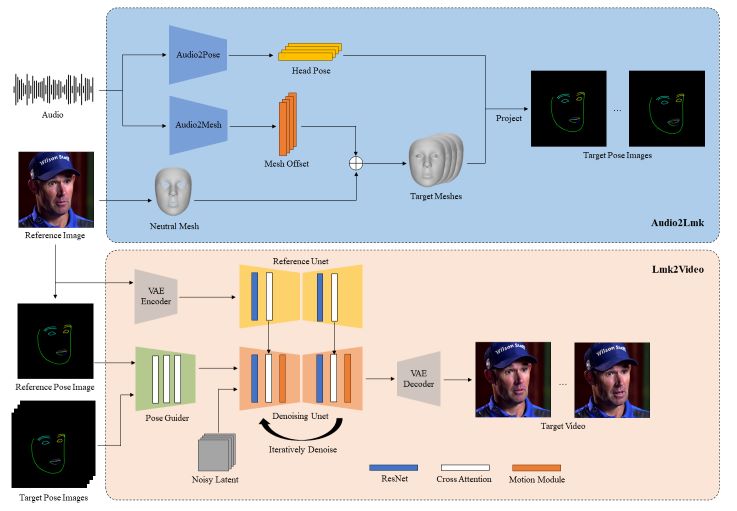
AniPortrait is a powerful framework that brings static portraits to life through captivating animations. It uses audio input and a reference portrait image to create dynamic facial movements, making your portraits expressive and engaging.

Installation
Build environment
We recommend a Python version >=3.10 and Cuda version =11.7. Then build the environment as follows:
pip install -r requirements.txtDownload weights
All the weights should be placed under the ./pretrained_weights directory. You can download weights manually as follows:
- Download our trained weights, which include four parts:
denoising_unet.pth,reference_unet.pth,pose_guider.pth,motion_module.pthandaudio2mesh.pt. - Download pre-trained weight of based models and other components:
Finally, these weights should be organized as follows:
./pretrained_weights/
|-- image_encoder
|   |-- config.json
|   `-- pytorch_model.bin
|-- sd-vae-ft-mse
|   |-- config.json
|   |-- diffusion_pytorch_model.bin
|   `-- diffusion_pytorch_model.safetensors
|-- stable-diffusion-v1-5
|   |-- feature_extractor
|   |   `-- preprocessor_config.json
|   |-- model_index.json
|   |-- unet
|   |   |-- config.json
|   |   `-- diffusion_pytorch_model.bin
|   `-- v1-inference.yaml
|-- wav2vec2-base-960h
|   |-- config.json
|   |-- feature_extractor_config.json
|   |-- preprocessor_config.json
|   |-- pytorch_model.bin
|   |-- README.md
|   |-- special_tokens_map.json
|   |-- tokenizer_config.json
|   `-- vocab.json
|-- audio2mesh.pt
|-- denoising_unet.pth
|-- motion_module.pth
|-- pose_guider.pth
`-- reference_unet.pth
Note: If you have installed some of the pre-trained models, such as StableDiffusion V1.5, you can specify their paths in the config file (e.g. ./config/prompts/animation.yaml).
Inference
Here are the CLI commands for running inference scripts:
Kindly note that you can set -L to the desired number of generating frames in the command, for example, -L 300.
Self-driven
python -m scripts.pose2vid --config ./configs/prompts/animation.yaml -W 512 -H 512You can refer to the format of animation.yaml to add your reference images or pose videos. To convert the raw video into a posing video (keypoint sequence), you can run the following command:
python -m scripts.vid2pose --video_path pose_video_path.mp4Face reenactment
python -m scripts.vid2vid --config ./configs/prompts/animation_facereenac.yaml -W 512 -H 512Add source face videos and reference images in the animation_facereenac.yaml.
Audio driven
python -m scripts.audio2vid --config ./configs/prompts/animation_audio.yaml -W 512 -H 512Add audios and reference images in the animation_audio.yaml.
You can use this command to generate a pose_temp.npy for head pose control:
python -m scripts.generate_ref_pose --ref_video ./configs/inference/head_pose_temp/pose_ref_video.mp4 --save_path ./configs/inference/head_pose_temp/pose.npyTraining
Data preparation
Extract key points from raw videos and write a training json file (here is an example of processing VFHQ):
python -m scripts.preprocess_dataset --input_dir VFHQ_PATH --output_dir SAVE_PATH --training_json JSON_PATHUpdate lines in the training config file:
data:
  json_path: JSON_PATH
Stage1
Run command:
accelerate launch train_stage_1.py --config ./configs/train/stage1.yamlStage2
Put the pre-trained motion module weights mm_sd_v15_v2.ckpt (download link) under ./pretrained_weights.
Specify the stage1 training weights in the config file stage2.yaml, for example:
stage1_ckpt_dir: './exp_output/stage1'
stage1_ckpt_step: 30000
Run command:
accelerate launch train_stage_2.py --config ./configs/train/stage2.yamlFor more information, visit the Github page of the project: